Polish Easter Butter Lamb
From capnron 17 years ago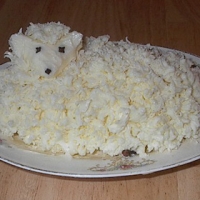
- - to make
- Serves 10
This is a recipe for making a butter lamb from scratch without using a mold. I can't emphasize too much that the butter MUST be the proper temperature to make the fur. Too soft and it will come out like butter (smooth, shiny, and unlike any fur that I've ever seen), too cold, and you won't be able to press it through the strainer. Read more Pictures are worth a ton of words, and the written directions are designed to go with the pictures. IU've posted them, and the full recipe on my website: http://www.capnrons.com/Easter_Butter_Lamb.html See less
Ingredients
- 1 Pound salted butter, European Butter shopping list
- 4 whole cloves shopping list
How to make it
- This is a recipe for making a butter lamb from scratch without using a mold. I can't emphasize too much that the butter MUST be the proper temperature to make the fur. Too soft and it will come out like butter (smooth, shiny, and unlike any fur that I've ever seen), too cold, and you won't be able to press it through the strainer. Pictures are worth a ton of words, and the written directions are designed to go with the pictures. I've posted them, and the full recipe on my website: http://www.capnrons.com/Easter_Butter_Lamb.html?id=GR
- Try to get one solid block of butter. If you'll look closely at this one, I had 2 half pounders, and had to let them get real soft so I could put it together. I then trimmed a little off the top of where the body would be and added that piece to the end to make it a little longer. I've also started the process directly on the plate I'm going to serve on. That's because it would be impossible to slide off the finished product to a different plate.
- This shows how much butter was taken off, as well as how the base (sheared) lamb looks
- One thing about the neck. Over the years there have been many funny disagreements about my Mother's lamb telling her that it looked like a dog instead of a lamb. I finally figured it out, by accident, that if you make the neck too tall, it looks more like a dog than a lamb. Be sure to make a very short neck, so it'll look like a lamb.
- To make the fur, work with the butter you've shaved off the block. Be careful of the temperature. It should be quite cold and a little hard. While you're working with it, you will probably have to put it in the freezer for a couple of minutes every once in a while. If this butter gets too warm, it will come through the mesh and not be separated. For 2005, I probably placed it back in the freezer 5 - 6 times, for the length of time it took me to take the fur off the strainer.
- Take the fur off the strainer with a thin, pointed knife.
- On the larger areas you can slide the fur off with your finger. However, if you're working around the neck of the base, you might want to slide it off with another knife.
- Last, but not least, place the cloves for the eyes, nose, and one rear hoo
People Who Like This Dish 3
- bobbyc0117 Canfield, OH
- crazeecndn Edmonton, CA
- capnron Charleston, SC
- Show up here?Review or Bookmark it! ✔

The Rating
Reviewed by 2 people-
what a great presentation for an Easter table.5
 bobbyc0117
in Canfield loved it
bobbyc0117
in Canfield loved it
-
OMG! These things are famous in my hometown of Buffalo, NY! They sell them at our local market for Easter every year. It is a MUST have for every table! When we moved I was sad we didn't have one so my dad grabbed sticks of butter, toothpicks, and c...more
 jezzka
in Port Orange loved it
jezzka
in Port Orange loved it
The Groups
- Not added to any groups yet!
Reviews & Comments 3
-
All Comments
-
Your Comments
" It was excellent "
" It was excellent "