Chocolate Bowls Recipe
From tuilelaith 13 years ago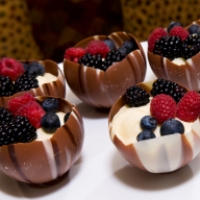
- 45 minutes to make
- Serves 1
This is a fun & easy project, although it can be messy! The chocolate bowls can hold all kinds of goodies including ice cream, mousse, fruit, pretzel sticks, chocolate candy, or any other treat you have in mind. Read more You can get as creative as you want with using white chocolate that has been colored (with specially formulated coloring oils) and coordinate the theme of your party or event. We recommend making more balloons than you'll need because chances are good that when you deflate some of the chocolate covered balloons the chocolate might fall apart for one reason or another! You can always reuse the chocolate...don't worry! Before you begin, make sure to wash and thoroughly dry the balloons. See less
Ingredients
- Ballons shopping list
- Non-Stick Spray shopping list
- melting chocolate shopping list
How to make it
- How To Make Chocolate Bowls:
- Blow up balloons and place them in a bowl to hold them upright.
- Don't blow them to be bigger than 6-8 inches tall.
- A lot of people like small bowls that are about the size of a coffee cup.
- It's up to you.
- Whatever size you blow up the balloon to be will be the size of your chocolate bowl.
- You might want to make the balloons slightly different sizes for variety.
- Spray each balloon (the area you'll be putting the chocolate on) with non-stick spray such as Crisco spray so that the chocolate will release easier.
- Melt or temper the chocolate using instructions that came with your chocolate. Ideally, use a double boiler (or a double boiler insert).
- Do not let the water touch the bottom of the double boiler.
- Only let the water simmer.
- Do not allow it to boil or you may burn the chocolate.
- If you must use a microwave, melt on medium heat for short periods being very careful not to overheat the chocolate.
- Let the chocolate cool for 5 - 10 minutes in a bowl that is sized so that you can dip your balloon into the bowl. The chocolate can't be so hot that it will pop the balloon.
- If you want to add a marbleized effect to the chocolate bowl:
- Pour the base color/flavor of chocolate in the bowl first.
- Then add a smaller quantity of a second color/flavor of chocolate on top.
- Swirl lightly with a knife.
- When you dip the balloons the bowl will look marbleized.
- There a couple of ways to make your chocolate bowls - or you can combine the methods for added flare.
- Either way, hold the balloon by the knot.
- a. For a solid bowl that looks like flower petals:
- Holding the knot at a slight angle, dip the ballon in chocolate, then using the opposite angle, dip the balloon again.
- You may be able to do this 2-4 times.
- Slowly swirl the balloon around to make an even coat.
- Then lift the balloon slowly and let some of the excess chocolate drip back into the bowl.
- Sometimes the balloons will need to be dipped twice to make sure the chocolate is solid enough.
- b. For a not solid bowl:
- Holding the knot, use a spoon to drizzle the chocolate over the bottom of the balloon going back and forth in one direction and then in the opposite direction.
- When drizzling, cover about half of the exposed balloon.
- Then dip the very bottom of the balloon a couple of inches into the chocolate so you have a nice, solid chocolate bottom.
- When doing this, you can use more than one chocolate flavor (or colored white chocolate) for added design.
- After each balloon is dipped, place on a Heavy Weight Dipping Sheet or waxed paper lined tray.
- The chocolate will start to settle making a flat bottom for the chocolate bowl.
- After your balloons are finished, move them to a cool area to set up (harden).
- Hopefully they will fit in your fridge!
- If so, they will set up in about 10 minutes.
- After the chocolate is completely set up, it's time to deflate the balloons.
- Gently remove the chocolate covered balloon from the dipping sheet.
- If using waxed paper, you might need to slide a knife around the bottom edge to loosen the bottom of the chocolate bowl.
- Once you remove the balloon, you can use a hat pin to deflate it or cut a small hole in the top of it to deflate it.
- Make the hole near the area where the balloon is tied.
- As the balloon deflates it will still be attached to the inside of the chocolate.
- Very slowly peel the balloon away from the chocolate.
- You can add additional decorative touches by gently handling the bowl and adding more drizzled chocolate.
- Keep the chocolate bowls cool until you plan to use them!
- http://www.chocoley.com/recipes/artistic/chocolate_bowls.htm
People Who Like This Dish 6
- mandymoore Wiggins, Ms
- ttaaccoo Buffalo, NY
- mommabaker Nowhere, Us
- midgelet Whereabouts, Unknown
- mrsbolettieri Nowhere, Us
- clbacon Birmingham, AL
- tuilelaith Columbia, MO
- Show up here?Review or Bookmark it! ✔

The Groups
- Not added to any groups yet!
Reviews & Comments 1
-
All Comments
-
Your Comments