Amazing Lump-free Pan Gravy
From divaliscious 18 years ago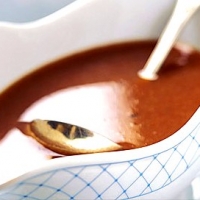
- 30 minutes to make
- Serves 8
Need helpful hints on making that perfect pan gravy lump-free? Well, here's one recipe that is sure not to fail you. Perfect for when you have roasted, pork, turkey or chicken. If you are lactose intolerant and by chance made mashed potatoes - save the water you boiled those potatoes in and use that instead of the milk. Read more .. See less
Ingredients
- One still warm Oven roasting pan with leftover drippings – Most pans are stove top safe, make sure and be careful. shopping list
- Whisk shopping list
- One working Stove Top shopping list
- Pot Holders shopping list
- Spoon for tasting shopping list
- Heat Safe Bowl to transfer the pan drippings shopping list
- Fine Strainer (Optional) (& in case of emergency) - (Keep reading, you will soon see why) shopping list
- **** shopping list
- 2 Tablespoons of drippings (fat) for each cup of gravy you want to make. shopping list
- 2 tablespoons of all purpose flour ( for each cup of gravy you want) shopping list
- salt & pepper to Taste shopping list
- fresh herbs of your Choosing shopping list
- 1 Cup of cold liquid per each cup of gravy (potato water, broth, milk) shopping list
How to make it
- Start Skimming
- Take pan and pour into a heat-safe bowl all of the drippings and large pieces you can get out of the roasting pan. Careful, it may be still hot, but that's good! Let drippings cool down just a bit – the fatty liquid may even separate a bit – and that's good. Place roasting dish on top of stove.
- Use of the Whisk
- Taking whisk, scrape off any browned bits from the bottom of the pan – these are the flavor enhancers, leave 'em in. Now preferably add the "darker" pan drippings (which inevitably are on the bottom of your heat safe bowl now) back into the roasting pan – remember 2 tablespoons of fat drippings for each cup of gravy you want to make.
- Start your Burners
- Add 2 tablespoons of flour to each two tablespoons of drippings you just added. Make sure the flame is on low. Whisk away to your heart's content at this point. You will want to cook off the flour for at least 2 to 4 minutes of cooking time. You do not want it to scorch this mixture though - hence why I did say keep the flame low, adjust yours now accordingly, thanks, we can now all continue.
- Adding the Liquids
- Add a 1/2 cup of liquid to start. Immediately start whisking. This is the imperative and most important part of the gravy making process. Let the liquid meld into the flour mixture. Add more accordingly. After each addition, let the mixture thicken at each stage of adding liquid. Once you get about three cups in, you can now add the rest all at once. It was simply important to get the first stage of the adding liquid part to have the initial part of the gravy thickened.
- Preferences Please
- I would not normally leave the gravy alone at this moment. I would be whisking pretty much the whole time. Slowly of course – don't tire yourself out – great time to get assistance at this stage – like a teenager with nothing else to do but text their way through the feast you worked so hard all day on – or of course then there's that too helpful relative that needs something to do to get out of your hair for just one moment! Grab them now to help "the continue to whisk till you drop" stage of the gravy making process. You can at this stage put up the heat to get your mixture to its boiling point. If you let it sit and not whisk– only the bottom liquids will thicken, and hence the beginning of your lumpy gravy disaster once you realize this. (And hence, what the strainer's for in case of emergency.)
- Boiling Yet?
- If a yes, put the burner way down on low at this point. You want your gravy to simmer for 5 minutes at least. Now is a good time to add your fresh herbs you wished to try, taste for need of salt and pepper. Once the gravy has met its boiling point – note that the gravy will thicken upon standing. After this, your gravy is ready – Welcome to the Gravy Train!
- Have You a Too Thin Gravy Mishap?
- Quick, without anyone looking, grab a teacup or other small vessel. Add 1-2 tablespoons of flour, add 2 tablespoons of cold water, stir with fork till all lumps are finito and mixture resembles Elmer's Glue – Add this into too thin gravy, whisk immediately, up the column on the burner, and whisk. Let it get to the boiling point, then return step above.
- What About a Too Thick Gravy Mishap?
- This can happen when you may have put too much flour in or when you return back to the kitchen to get more for seconds or thirds and the gravy has cooled down and is not a thick mess with a skin layer. You can simply add more liquid slowly at first, a little at a time, yes, get that whisk out, and stir away while allowing the gravy to reheat. It should thin out just lovely, thank you.
People Who Like This Dish 3
- mmcsc420 Columbia, SC
- pats1013 NJ
- divaliscious Dutchess County, NY
- Show up here?Review or Bookmark it! ✔

The Groups
- Not added to any groups yet!
Reviews & Comments 1
-
All Comments
-
Your Comments