Sugar Skulls for Day of the Dead
From deliathecrone 18 years ago
- - to make
- Serves 1
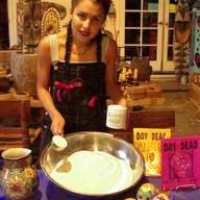
Sugar Skulls are a traditional folk art from Southern Mexico used to celebrate Day of the Dead. Mounds of colorful sugar skulls are sold by Indian vendors in open air village markets during the week preceding the holiday. Read more Spirits of the dead are welcomed back to their homes with beautifully decorated altars made by their loved ones. Sugar skulls, marigolds, candles, incense and special foods adorn home altars. Families take the flowers and sugar skulls to the cemetery to decorate the tombs on November 2. Sugar skulls are colorfully decorated with icing, pieces of bright foil, colored sugars and usually bear the name of the deceased loved one being honored. They are easy to make by children and adults, and if kept dry, they can last a year. Make sugar skulls as part of your family tradition to remember your dear, departed loved ones. See less
Ingredients
- CAUTION: Do not make sugar skulls on a rainy or high humidity day. They will not turn out. shopping list
- Mix together well in large bowl: 1 teaspoon Meringue Powder for every cup of granulated sugar used. shopping list
- Variation: Colored Skulls Most people prefer white skulls the first time they make them, but if you'd like colored sugar skulls, add paste food coloring TO THE water. shopping list
- For a 5 pound bag of sugar, use 1/4 cup meringue powder and 10 teaspoons of water. [Yield 5 large skulls or 20 medium skulls or 100 mini skulls or any combination.] shopping list
- For a 10 pound bag of sugar, use 1/2 cup meringue powder and 7 Tablespoons water. [Yield 10 large skulls or 40 medium skulls or 200 mini skulls or any combination.] shopping list
- Yield Table shopping list
- Mold Size # of Skulls sugar (lbs) Meringue Pdr water (Tbsps) shopping list
- Large 10* 10 # 1/2 cup 7 T shopping list
- Medium 40 10 # 1/2 cup 7 T shopping list
- Mini 200 10 # 1/2 cup 7 T shopping list
- ..... shopping list
- Large 5* 5 # 1/4 cup 3 T shopping list
- Medium 20 5 # 1/4 cup 3 T shopping list
- Mini 100 5 # 1/4 cup 3 T shopping list
- * 5 pounds of sugar = approx.10 cups shopping list
- * 10 pounds of sugar = 21 cups shopping list
- Meringue Powder Conversion Table shopping list
- Weight Cups (approx.) Tbsps Tsps shopping list
- 4 oz. Jar 1 cup 16 T 48 t. shopping list
- 8 oz. Jar 2 cups 32 T 96 t. shopping list
- 1 lb. Bag 4 cup 64 T 192 t. shopping list
- Meringue Powder is a "Must" and cannot be omitted. Meringue powder is what makes the sugar and the icing hard. Its main ingredient is powdered dry egg whites & starch, but it also includes shopping list
- vegetable gum, cream of tarter, calcium lactate, malic acid & sodium aluminum sulfate. It's totally edible. shopping list
- powdered sugar FOR ROYAL icing shopping list
- 1 Pound Box - 3 1/2 cups shopping list
- 2 Pound Bag - 7 cups (do not sift powdered sugar) shopping list
- Measurement: 3 teaspoons make a Tablespoon: 4 Tablespoons make 1/4 cup. But for this recipe, 7 Tablespoons (21 teaspoons) of Meringue Powder = 1/2 cup! sugar Skull making is not an exact science... shopping list
- MATERIALS NEEDED: shopping list
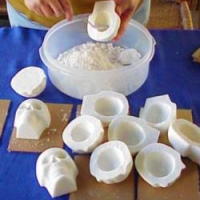
- sugar Skull Molds shopping list
- Granulated sugar shopping list
- powdered sugar shopping list
- Meringue Powder shopping list
- Decorations, Colored Tin Foils, paper Flowers, Sequins, etc. shopping list
- Corrugated Cardboard squares, (one for each piece made) Some 6"x6" for large skulls, Some 3"x4" for medium / mini skulls shopping list
- Large Metal bowl shopping list
- Measuring Spoons shopping list
- 1 cup liquid measuring cup shopping list
- 1/4 c. dry measuring cup shopping list
- Plastic spray bottle for water shopping list
- electric / stand mixer shopping list
- 16 oz. Solo plastic cups shopping list
- butter knives or tongue depressors for mixing color into icing shopping list
- Pastry Bags shopping list
- paper Towels shopping list
How to make it
- CAUTION: Do not make sugar skulls on a rainy or high humidity day. They will not turn out.
- Mix together well in large bowl: 1 teaspoon Meringue Powder for every cup of granulated sugar used.
- Step 1: Mix dry ingredients well.
- Step 2: Sprinkle sugar mixture with 1 teaspoon water per cup of sugar used.
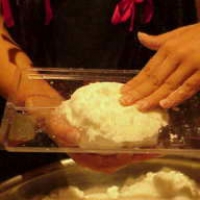
- Mix well with hands until every bit of sugar is moistened. If your fingerprints remain when you squeeze the sugar in your hand, it is ready to mold.
- It should feel like cool "beach sand." If it doesn't hold together, mixture is too dry.
- Remember, water sinks, so keep the sugar mixture mixed up frequently as you make your sugar skulls.
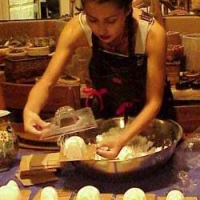
- To Mold: Pack sugar mixture FIRMLY into mold with special attention to chins & edges. Use a straight edge to scrape the back of the mold flat. Pack down some more until perfectly tight. Place a stiff cardboard square (approx. 5" x 6") over mold and invert immediately. Lift mold off carefully. Throw any "mistakes" back into your bowl, stir up and try again. If mix is too dry, spritz with a water bottle.
- Tip: If all the sugar mixture does not fall out of mold easily, it is too wet. Re-mix with a bit more sugar. Handwash and dry your mold after every 5 skulls to avoid sticking. Most Sugar Skull makers will have a collection of molds to make the molding process more enjoyable.
- To Dry: All sizes of the molded sugar skulls need to air-dry on a piece of plain cardboard from 8 hours to overnight. Medium and Mini skulls may be decorated after they are completely dry.
- Large skulls require a few more steps. They are a 2-piece mold, and must be "scooped out" after they dry for 8 hours. When the skulls feel dry enough to handle, hold skulls carefully and hollow both the back and the front out with a spoon, leaving the skull wall 1/2" thick. Do not scoop out the neck area.
- Set the hollowed skulls upside down to continue drying until totally dry. (Approx. 12 hours.) When completely dry, dust off and assemble the front and back of the skull with a 1/4" bead of thick royal icing, either applied with a knife or squeezed from an icing bag (one side only). Align points on the back of the skull with the sides of the neck, and press the two sides together until they are firmly connected. The icing will ooze out a little. Drag your finger over the seam to remove excess icing. Try to do this with just one pass--touching the skull too much will make the icing look bad. Drag your finger across the base of the neck crack to remove excess icing. Lay skull aside to dry. When seam is dry, about 2 hours minimum, it is ready to decorate.
- Tip: When assembling the Large skull, if the two pieces of the skull are sliding around, your royal icing is too wet. Add a Tablespoon of powdered sugar to your icing, to stiffen it up a bit.
- Tip: The sugar "scoopings" from Large Skulls will net about 50%. Sugar will be soft and moist and may be made into smaller skulls. This moist sugar may be stored in plastic tightly-topped box for a day or two. When you're ready to use sugar, give it the hand-squeeze test. If too dry, spritz with the water bottle until it holds together again.
- Tip: When assembling the Large skull, if the two pieces of the skull are sliding around, your royal icing is too wet. Add a Tablespoon of powdered sugar to your icing, to stiffen it up a bit.
- ROYAL ICING RECIPE
- MIX: 2/3 cup water, 1/2 cup Meringue Powder and 2 pounds Powdered Sugar with an electric/stand mixer until icing peaks (about 9 minutes!) Don't mix up more than 2# at a time. Keep in a tightly covered container. DO NOT REFRIGERATE.
- Royal icing is a cement type icing used for gingerbread house construction. It isn't very tasty, but it is strong, dries pretty and lasts. Use ONLY concentrated paste food colorings (NOT liquid food
- coloring from the grocery store!) Mix icing & paste colors in disposable cups. Use pastry bags and metal decorating tips if you are a pro or into cake decorating or substitute a Ziploc freezer bag for a pastry bag and make a very small snip in the corner of the bag. Add 2-3 ounces of Royal Icing (no more than 1/4 full). Squeeze to decorate.
- Calculate: each 5 pounds of sugar skulls will need 2 pounds of powdered sugar Royal Icing. Most skull makers prefer 5-6 paste colors to decorate with, and at least one pack of colored tin foil.
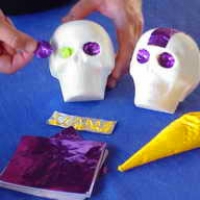
- ALL SKULL SIZES: Have fun decorating your skulls with colored Royal Icing, sequins, feathers, beads, even earrings made from soda pop tops. Colored foil and icing are how Mexican sugar skulls are decorated. Foil is pasted down with icing, and is great for making crowns, crosses, hearts, shiny eyes or even pipes. Labels, wrappers, trinkets and shells can personalize a skull in memory of your dear, departed loved one. Be creative. Have fun. Kids down to kindergarten have fun decorating sugar skulls.
- Can you eat the Sugar Skulls??? There is nothing that will make you sick in Sugar Skulls except for the tin foil and other decorations. However, after all the handling that is done to make them, they aren't very clean! So, NO, you shouldn't eat a sugar skull. They are for decorative purposes only.
- Tradition: The traditional Mexican sugar skull is being placed on the home altar or the tomb to honor a deceased loved one. It decorates the altar and make it a happy place for the spirit to visit. Names of the loved one is usually written on the skull with icing in the market by the sugar skull maker. You can customize your skulls with characteristics that you remember--like a tin foil pipe for Grampa Joe who smoked a pipe on the porch after dinner.
- Sugar Skull Decorating Party - If you're having a party, make up your skulls ahead of time. Prepare your icing and have it ready in bags... Cover your tables, lay out all the icings and decoration supplies, and play Mexican music! Margaritas???
- *DO NOT ATTEMPT TO MAKE SUGAR SKULLS ON A HUMID DAY. That means Rain, Rain tomorrow, or yesterday. Sugar freaks out around damp air and the skulls won't dry right, stick right, or hold the icing on. Check your weather forecast.
- If you were to have an unexpected rain storm in mid-project, the only tip I can give you is to pray. Then, see if you can "candle" the skulls in a low oven (150 degrees) for 15 minutes. Lay them on cookie sheets covered with thick newspapers to wick the moisture from the skulls. If they don't scorch, you may have fooled Mother Nature. Turn the oven off, and let the skulls sit in the oven over night.
- © 2008 Reign Trading Company
 Getting set
Close
Getting set
Close


 bellasmom
 lunasea
Reviews & Comments 5
-
All Comments
-
Your Comments
" It was excellent "
" It was excellent "