Filo Fruit Pastries
From mystic_river1 18 years agoIngredients
- 4 thin filo sheets shopping list
- 2 - 3 tbsp unsalted butter, clear yellow liquid shopping list
- 1/4 tsp oil shopping list
- 2 1/2 - 3 cups whipped topping, thick shopping list
- fruit of choice: strawberries, blueberries, raspberries, etc. shopping list
- 1 cup prepared store-bought custard sauce or Crème Anglaise sauce, refrigerated shopping list
- icing sugar shopping list
- HELPFUL TOOLS FOR MAKING PASTRY shopping list
- 2 large (11 x 17-inches) identical baking sheets, non-stick shopping list
- parchment paper shopping list
- small non-stick pot shopping list
- small bowl shopping list
- pastry brush shopping list
- 2 linen kitchen towels shopping list
- pizza cutter shopping list
- measuring tape shopping list
- 4 large metal paper clips (clean: never before used) shopping list
- electric mixer shopping list
- pastry bag and 1/4 - 1/2-inch star tip shopping list
- sieve shopping list
How to make it
- Notes:
- The filo sheets used measured 12 1/2 x 17-inches wide. If your filo sheets are different in size, then try to cut the square and rectangles into equal sizes. Keep a close eye on things because the filo can bake in a shorter or longer time, depending on its thickness; always check after the shortest baking time.
- Your own or store-bought custard can be used. Make the custard in advance. The consistency of the custard should be like gravy.
- Fresh or frozen (thawed) strawberries, blueberries, raspberries or a combination can be used. Chocolate sauce can be substituted for the fruit.
- The pastries only take a few minutes to assemble. They can, however, be assembled with the topping alone, 1 hour in advance and then completed with the custard and fruit right before serving them. Some of the filo, though, will lose its crispiness.
- --------------------------------------------------------------------------------
- Making the Rectangles:
- Position an oven rack on the second to lowest level and preheat the oven to 325'F. Cut 2 sheets of parchment paper to fit the bottom of the pans. Line one pan with one sheet of paper and reserve the other sheet and pan for later. Melt the butter, allowing the milky part to settle and then measure about 3 tablespoons of the clear yellow liquid into a small bowl; discard the milky residue. Mix the oil into the yellow liquid: set aside.
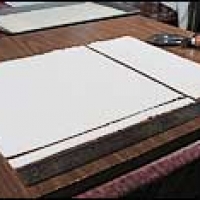
- On a large working surface, place the 4 filo sheets stacked together. Measure and cut a 12 x 12-inch square from either end (picture 1). Reserve the cut off 12 1/2 x 5-inch or so rectangle, folded between 2 towels: set aside. Discard the 1/2-inch long strip.
- Working quickly with the 12 x 12-inch stack of sheets: remove and set aside the top 3 filo sheets. Brush the fourth filo sheet, left on the work surface, with a bit of the melted butter. Restack the sheets, one at a time, brushing each sheet with butter and brushing the top sheet with the butter. Measure the square to make sure it's 12 x 12-inches and then cut it into 12 rectangles, each measuring about 3 x 4-inches, using pizza a cutter; trim any rectangles, if necessary. Place the rectangles into the parchment lined pan, cover with the second piece of parchment paper and pan, and then bake them in preheated oven for 5 minutes. Remove the top pan and paper, and then continue baking them for 1 - 2 minutes or until the rectangles are golden brown; cool the rectangles in the pan. Baking the rectangles covered with a second pan helps to keep the filo rectangles flat, instead of bubbly and uneven. In the meantime, start making the fans.
- When the rectangles have baked, lower the oven temperature to 300'F. Open the oven door for 15 seconds or so, to quickly cool down slightly; otherwise, the edges of the fans will burn and the gathered area will still be raw.
- --------------------------------------------------------------------------------
- Making the Fans:
- Slightly pry open the paper clips: set them aside.
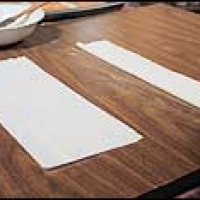
- Place one of the reserved rectangle sheets onto your work surface and keep the others between the towels. Dip the brush into the butter once and then drag the brush against the rim of the bowl to remove excess butter. Then brush the rectangle very lightly with the butter; the filo shouldn't be completely coated with butter, except for the edges. Fold the rectangle over in half lengthwise and then brush it again lightly with butter, in the same manner (picture 2). The filo strip should be a little on the dry side; otherwise, the pleats won't hold in place, and the fan won't stand upright and turn out well (picture 6).
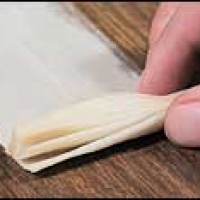
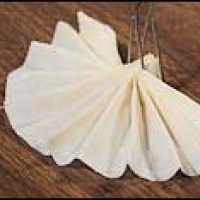
- Fold the strip from one end to the other, in an accordion style, making 1/2-inch pleats (picture 3). Secure the gathered end of the long side that was not folded together with a paper clip (picture 4) and then carefully open the other end into a fan (picture 5); set the fan aside upright and repeat with other fans. Set the fans into the second pan, which has been lined with parchment paper. Bake in a 300'F. oven for 7 - 10 minutes or until most of the edges are golden brown; a bit of the gathered areas will be lighter in colour. Cool the fans in the pan and then remove the paper clips carefully.
- --------------------------------------------------------------------------------
- Assembling the Pastries:
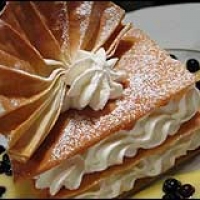
- Pipe a 1/2 teaspoon of whipped topping into the centre of a serving plate. Place a baked rectangle (containing 4 filo sheets) over the topping; carefully press down on the rectangle to secure it onto the plate. Pipe some whipped topping using a pastry bag fitted with a star tip, about 3/4-inch high, over the rectangle, in a decorative manner. Place a second rectangle over this and then pipe another layer of topping; hold the rectangles in place during piping. Top with a third rectangle. Pipe a swirl on the top. Place a fan next to the swirl and then pipe another swirl to cover the gathered part of the fan. Pour a few tablespoons of custard sauce around the pastry, arrange the fruit around the plate and then dust the top with icing sugar: serve within 10 minutes or so.
- 1. Four stacked filo sheets cut into a large 12 x 12-inch square, rectangle and short strip.
- 2. Left: one open rectangle. Right: rectangle folded lengthwise into a narrow strip.
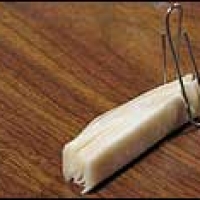
- 3. Narrow strip folded, accordion style, with pleats.
- 4. When the strip has been pleated, the unfolded side is gathered together and secured in place with a paper clip.
- 5. The fan is opened up, resting on the work surface. To bake: fan is placed up right, using clip to balance in place.
- 6. Left: fan lightly brushed with butter. Right: fan brushed with too much butter, filo was saturated and did not hold up during baking: fan collapsed.
- Looking Back at Everything You've Made!
- Restacking the filo squares and removing the paper clips from the baked fans may seem a little intimidating; however, it can be done with a little patience. If the fans break on you, then simply use more sheets, or omit them and instead, pipe a decorative stream on the top of the pastries.
People Who Like This Dish 8
- juels Clayton, NC
- liezel Bloemfontein, ZA
- organicmama CA
- fuzzy OH
- migvia Houston, TX
- eclaires Chicago, IL
- sina Penticton, CA
- jeffsgirl Medford, OR
- clbacon Birmingham, AL
- zanna MOUNT CLEMENS, MI
- Show up here?Review or Bookmark it! ✔
The Rating
Reviewed by 4 people-
Looks like the work is worth the effort!! Beautiful pics!!
 liezel
in Bloemfontein loved it
-
A lot of work but these are beautiful...WOW!
 organicmama
in loved it


Reviews & Comments 3
-
All Comments
-
Your Comments
" It was excellent "
" It was excellent "