Individual Mushroom Quiches
From luisascatering 13 years ago
- 1 hour to make
- Serves 6
I made these by request for my clients that were taking food on their private plane the following morning. Individual pot pie tins and lids make it great for a "to go" meal. I'm always disapointed in quiches that are baked in premade crusts - there is nothing better than a real butter crust! Read more For that reason the extra work to make it homemade is totally worth it :-) See less
Ingredients
- Pâte Brisée: shopping list
- 3 cups all-purpose flour, plus extra for rolling shopping list
- 1 teaspoon salt shopping list
- 1 teaspoon sugar shopping list
- 2 sticks organic, unsalted butter, very-cold, cut into 1/2 inch cubes shopping list
- 4-8 Tbsp ice water, very cold shopping list
- ~ shopping list
- Filling: shopping list
- 2 tablespoons unsalted butter shopping list
- 2 medium shallots, minced shopping list
- 1 pound mushrooms (any kind or a mix), quartered or sliced shopping list
- sea salt and ground white pepper shopping list
- 2 cups half and half shopping list
- 6 large eggs shopping list
- freshly grated nutmeg, to taste shopping list
- 3 cups aged white cheddar cheese, grated shopping list
- 3 green onions, sliced shopping list
How to make it
- Make Pâte Brisée:
- Place the flour, salt, and sugar into a food processor and pulse until well combined. Add half of the butter cubes and pulse 6 to 8 times. Then add the other half of the butter cubes and pulse 6 to 8 more times. You should have a mixture that resembles a coarse meal, with many butter pieces the size of peas.
- Add a couple of tablespoons of ice cold water (without the ice!) to the food processor bowl and pulse a couple of times. Then add more ice water, slowly, about a tablespoon at a time, pulsing after each addition, until the mixture just barely begins to clump together. If you pinch some of the crumbly dough and it holds together, it's ready, if not, add a little more water and pulse again. Try to keep the water to a minimum. Too much water will make your crust tough.
- Remove the crumbly mixture from the food processor and place on a very clean, smooth surface. If you want an extra flaky crust, you can press the heel of your palm into the crumbly mixture, pressing down and shmooshing the mixture into the table top. This is a French technique, called "fraisage". Do this a few times, maybe 4 to 6 times, and it will help your crust be extra flaky. Then, use your hands to press the crumbly dough together and shape into a disc. Work the dough only enough to just bring the dough together. Do not over-knead or your crust will end up tough. You should be able to see little bits of butter, speckling the dough. When these bits of butter melt as the crust cooks, the butter will help separate the dough into flaky layers. So, visible pieces of butter are a good thing, what you are aiming for, in the dough. Sprinkle the disc with a little flour on all sides. Wrap the disc in plastic wrap and refrigerate at least 1 hour. (At this point you can freeze the dough disk for several months until ready to use. Defrost overnight in the refrigerator before proceeding.)
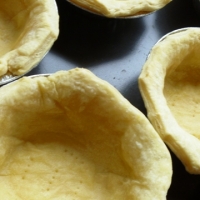
- When you are ready to roll out the dough, remove the disk from the refrigerator and place on a clean, smooth, lightly floured surface. Let it sit for 5 to 10 minutes to take just enough of a chill off of it so that it becomes easier to roll out. Divide dough into 6 pieces and roll each out into a circle, about and inch larger than the rim of your pot pie tin. Place each round in to the tins, pressing down on bottom and sides. Place on baking sheet and transfer to freezer to chill for 30 minutes.
- Preheat oven to 350°. Cover each crust with a circle of parchment , pressing into the corners and edges. Fill at least two-thirds with baking weights (I used dried beans but rice works too) Bake first for 15 minutes, remove from oven and let cool a few minutes See Photo. Carefully remove parchment paper and weights. Poke the bottom of the pie pan with the tongs of a fork and return to oven and bake an additional 10 minutes or until lightly golden See Photo. (Fork holes are for any air to escape.) Transfer to a wire rack to cool while making filling
- Filling:
- Heat butter in a large nonstick skillet over medium high heat. Add shallots, and cook, stirring, until translucent but not brown, about 1 minute. Add mushrooms, and season with salt and white pepper. Cook, stirring frequently, until mushrooms first release their liquid and then liquid evaporates and mushrooms are dark golden brown, 8 to 10 minutes.
- Assembly:
- Sprinkle half the cheese evenly over each bottom of the crusts. Spread mushrooms over the cheese and then top with remaining cheese and green onions. In a medium bowl, whisk together milk, cream, and eggs. Season with nutmeg, salt, and white pepper. Pour evenly into each See Photo. Top each with green onions. Transfer on baking sheet to oven, and bake until just set in the center, 30 to 35 minutes. Cool on a wire rack for about 10 minutes before serving. See Photo


Reviews & Comments 3
-
All Comments
-
Your Comments