Elaines Decorative Harvest Sheaf Loaf
From chefelaine 17 years ago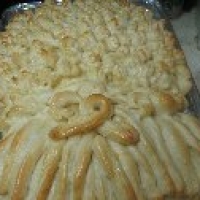
- 50 minutes to make
- Serves 12
When Fall arrives, we who appreciate growing our own veggies love to celebrate the harvest. While we all will miss the growing season, we can reflect so fondly on what has grown successfully, and what has successfully ‘made it’ to our dinner table. Read more This recipe celebrates the FALL harvest …….. WHEAT – the STAFF of LIFE………… BREAD…… the BASIS of our existence! This loaf looks like a lovely sheaf of wheat. Plain, simple wheat, yet so elegant in its appearance, this loaf almost looks too lovely to slice. But it is, after all, BREAD! Baked with love, and made to enjoy! See less
Ingredients
- 8 cups unbleached white flour shopping list
- 2 2/3 cups water shopping list
- 1 egg shopping list
- 1/3 cup olive oil shopping list
- 1 tbsp salt (large loaf is the result, so the salt amount is negligible) shopping list
- 5 tbsp lukewarm milk shopping list
- 1 pkg bakers’ yeast shopping list
- EGG WASH: shopping list
- 2 whole eggs, beaten shopping list
How to make it
- Mix the yeast in with the milk; allow to activate
- Assemble and combine all the dry ingredients
- Make a well in the center of the bowl, and add the yeast mixture, then add the egg
- Add the water
- Mix well, and keep mixing until the dough starts to come away from the sides of the bowl
- KNEAD to the smooth and blistered stage, which takes about 15 minutes
- Form into a round ball
- Place a little olive oil in the bottom of the bowl
- Place the dough ball into the bowl
- Coat with olive oil (this prevents a crust from developing, which would create problems for proofing; it also keeps the ball from drying)
- Place in a warm area to rise; allow to rise about 2 hour, or until doubled in bulk
- Form the loaf!
- Cut the dough in half. Reserve the other half under a to prevent it from drying or hardening
- Create a mushroom shape for the base.
- Pinch in below the center to make the shape more obvious
- Coat with a brush with plain water, then:
- Coat with egg wash to prevent the base from drying while you work on the next stage
- The sheaves:
- Taking some of the reserved dough, roll into long strips, then cut as illustrated
- Roll each little ball in your hands to form an oblong piece.
- Make one end a bit pointed.
- NOW comes the fun!
- With scissors, cut a few notches in this piece as illustrated, to resemble the wheat
- You will be making over one hundred of these, so patience is a must!
- Do likewise with more pieces of dough.
- Assemble from the top of the loaf, then interlap as shown
- Keep added these little pieces until the sheaf is full.
- ==============================================
- NOTE:
- Brush the pieces every so often as the sheaf pieces are added. This will help them adhere to the base, as well as prevent them from forming a dry crust, which inhibits proofing!
- Now for the bottom portion:
- Roll strips of dough to resemble the sheaf stems, and place on the base as shown
- Make a braid of dough to place on the sheaf to resemble it being tied.
- Pinch in the ends to make the shape more defined as a ‘tied’ sheaf of wheat
- Cover the entire loaf liberally with more egg wash
- Allow to rise until doubled in bulk
- Bake at 400*F for the first 15 minutes
- Now reduce the heat to 350*F and continue baking another 30 to 35 minutes, or until the loaf is a light golden brown, and sounds hollow when tapped
- Allow the loaf to cool on the baking sheet
- =======================================
- NOTE:
- This loaf is time-consuming to prepare, but well worth the effort for the final result!
- Again, patience is the key, but the finished produce is well worth all the work ! :+D
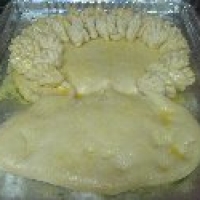 basic shape
Close
basic shape
Close
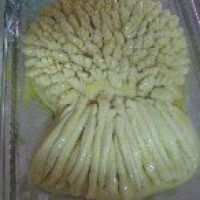 proof-ready!
Close
proof-ready!
Close
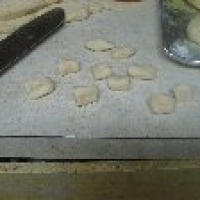 cut into cubes
Close
cut into cubes
Close
 ready to bake!
Close
ready to bake!
Close

The Rating
Reviewed by 17 people-
Elaine, this is really attractive, and I've flagged it. HIGH FIVE, kid!
Pete:) dagnabbit
in Barrie loved it
dagnabbit
in Barrie loved it
-
Amazing, Chef! Gets five from me!
 pantryraider
in Kansas loved it
pantryraider
in Kansas loved it
-
Chef Elaine, truly your attention to detail merits your title. A lovely loaf! You are certainly a credit to the culinary arts. Felicitations and high five.
Chef P chefperiwinkle
in Scarboro loved it
chefperiwinkle
in Scarboro loved it
The Groups
- Not added to any groups yet!
Reviews & Comments 12
-
All Comments
-
Your Comments
" It was excellent "
" It was excellent "
" It was excellent "
" It was excellent "
" It was excellent "
" It was excellent "
" It was excellent "
" It was excellent "
" It was excellent "
" It was excellent "