Garbage Can Turkey
From hollymayb 18 years ago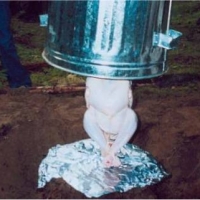
- 120 minutes to make
- Serves 10
I've done this production many times and everyone always says it's the best bird they've ever had. Of course, by the time we get to eating it, there's usually a pretty big pile of empties, but a compliment is a compliment.
Ingredients
- New metal garbage can shopping list
- Wooden pole - 1 inch thick, 3 feet long shopping list
- 20 pound bag of charcoal shopping list
- aluminum foil shopping list
- whole turkey, cleaned (mine are usually about 16-18 lbs) shopping list
- potatoes, carrots, and green beans shopping list
How to make it
- At home, clean the turkey and tie the wings firmly to the bird. Do not season or stuff the turkey.
- At camp, light half the charcoal on the upside down lid of the garbage can. It is ready to use when white.
- Pound the pole about 1 1/2 feet into the ground.
- If you can find the smaller-sized, 10-gallon metal garbage cans, you're set. Otherwise, if you're working with a 20-gallon can, you'll need to dig a trench or lower the can into the sand by 8-10 inches. This reduces the volume of the can so that there will be less air to heat, and cooking time will be faster.
- Make a tinfoil ball around the top of the wooden pole. It should be the size of a baseball. An empty pop or beer can forced onto the top also works.
- Place the bird cavity down onto the pole and foil ball. The foil ball or can will support the bird while it cooks and stop the pole from going all the way through. Be sure not to let the turkey touch the ground.
- Lower the garbage can over the turkey. No part of the turkey should touch the sides or top of the can. Remember, if you are using a 20-gallon can, you will need to dig a trench to provide a raised platform inside the can. If you do not do this, the turkey will not cook sufficiently.
- Transfer the hot charcoal from the lid of the can to around the sides and on top of the can. The coals along the sides should be piled as high as possible to be close to where the turkey is inside. If using a large sized can, you may want to build up a ledge around the sides of the can with dirt or sand and put the coals on top of the ledge. Add coals as necessary. You will probably use the whole bag.
- Wrap single potatoes in tin foil and place on top of the can to bake. Leave them there for the full cooking time of the turkey. Don't forget to poke the potatoes with a fork!
- Wrap the cut carrots and beans (and any other vegetables you might like) in foil with a little water and butter and roast over coals for the last 30 minutes of cooking time. You can add powdered soup mix or, if you're like me and camp with a spice rack, your favourite spice combos. You may want to double wrap in heavy foil so the vegetables don't burn.
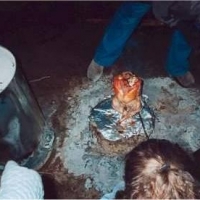
- After 2 hours, put on oven mitts. Carefully and slowly lift the can off the turkey. Test it by poking it in the thigh with a knife or roasting stick. If the juices run clear, it's done; if not, replace the can and add more coals and cook for an additional 30 minutes. Turkey should be a crispy golden brown.
- Share and enjoy! Serve with instant stuffing and gravy. You are now the talk of the campsite!

The Rating
Reviewed by 2 people-
Give you a great big 5!. Fantastic recipe and thanks for sharing.
 mystic_river1
in Bradenton loved it
mystic_river1
in Bradenton loved it

Reviews & Comments 6
-
All Comments
-
Your Comments
" It was excellent "