HOMEMADE PANCETTA
From greekgirrrl 18 years ago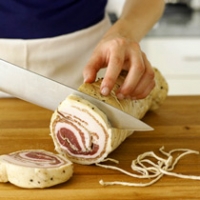
- 1-00000 minutes to make
- Serves 100
Pancetta is cured pork belly, the Italian equivalent of bacon. Unlike American bacon, however, pancetta is cured with a variety of herbs, spices, and garlic, and is left unsmoked. Pancetta is usually rolled and tied in a cylindrical shape, then hung to dry. Read more Some versions, such as the variety made in Florence, are left flat. This is the rolled kind, This is not as hard as it seems, just takes some time. Approx. 3 weeks for hanging See less
Ingredients
- WHAT TO BUY: pork belly is the same as fresh bacon. You can order it from a good butcher or buy it online from Niman Ranch. A whole fresh pork belly with the skin on weighs around 11 pounds, of which you’ll need half (a 5-1/2-pound slab) to make 1 pancetta. If you like, you can ask your butcher to remove the skin for you, making the total prep time minimal. shopping list
- Curing salt, also known as pink salt or saltpeter, contains 6.25 percent sodium nitrite. It is colored pink so as not to be confused with regular salt. Curing salt should be available at your local butcher. shopping list
- I like to use kosher salt in our recipes. It’s especially important to use kosher salt here to ensure that your quantity is correct. I prefer Diamond Crystal brand, available in most grocery stores. shopping list
- Special equipment: In addition to your chef’s knife, you’ll also need a boning knife to remove the skin. Be sure to have a spool of cotton butcher’s twine for tying and hanging your pancetta. shopping list
- I found that giant storage bags, like the jumbo 2-gallon bags by Ziploc, were perfect for holding the pancetta during the curing process. shopping list
- Find a cool place to hang your pancetta, away from windows and direct sunlight. And of course make sure you allow enough time for the curing and hanging processes. shopping list
- 1 (5-1/2-pound) piece of fresh, skin-on pork belly (1/2 of a whole belly slab), or 1 (11-pound) whole belly shopping list
- FOR THE CURE: shopping list
- 2 tablespoons whole black peppercorns, plus 1 tablespoon for after curing shopping list
- 2 tablespoons whole juniper berries shopping list
- 1/3 cup kosher salt shopping list
- 3 tablespoons dark brown sugar shopping list
- 2 teaspoons curing salt shopping list
- 1/2 teaspoon ground nutmeg shopping list
- 3 garlic cloves, minced shopping list
- 3 fresh or 5 dry bay leaves, torn into small pieces shopping list
- 2 teaspoons fresh thyme leaves shopping list
- 1 tablespoon fresh rosemary leaves shopping list
How to make it
- If you’re starting with a full (11-pound) piece of fresh pork belly, slice it in half crosswise to make two (5-1/2-pound) pieces. You only need one half for this project, so seal up the other well with plastic wrap and freeze it for up to 6 months.
- Place the pork belly meat side up. Using a sharp boning knife, make the piece more level by trimming off any extra bits of muscle or fat. Square off the edges with a chef’s knife.
- Rinse the pork belly and pat it dry. Place it on a cutting board, skin side up. To remove the skin, use a sharp boning knife. Starting at the bottom left corner, slice in horizontally just under the skin but above the fat layer. Pull the flap of skin toward your body, holding it taut as you loosen it from the fat with a series of small horizontal cuts. Be careful not to remove too much fat or cut too deeply. (Pulling the skin toward you as you cut helps prevent this.)
- Keep cutting until the skin is completely removed, then use your knife to even out the fat layer a little.
- Place the 2 tablespoons of peppercorns and the juniper berries on a rimmed baking sheet. Use a heavy pot to crush them. Combine them in a mixing bowl with the rest of the cure ingredients. Mix the cure very well to evenly distribute the ingredients.
- Place the pork belly on a rimmed baking sheet and rub the cure all over its surfaces, making sure to coat both the fat and lean sides, and all the edges and corners. Carefully place the belly in a large (2- to 2-1/2-gallon) sealable bag. Once it’s inside, rub the belly to redistribute the ingredients that may have fallen off while you moved it. Fold over the excess plastic and press down to remove as much air as possible. Seal the bag. (Alternatively, you may place the cure-coated belly in a glass baking dish and cover tightly with plastic wrap.)
- Place the bagged pork belly on a baking sheet and place it in the refrigerator. Weight it by placing a pot or dish that is roughly the same size as the pork right on top of the bag, and place a 3-pound weight in the dish. (A box of salt or a few cans of tomatoes work great.)
- Refrigerate the weighted belly for 7 days, flipping it over every day. After 7 days, remove the belly from the refrigerator and press down on it to check the firmness. It should feel uniformly firm throughout, as if you’re pressing down on a soccer ball. If the belly is still squishy like raw meat, return it to the refrigerator for up to 3 more days.
- Remove the pork belly from the refrigerator and rinse off the curing mixture under cool running water. (It’s OK if there are still a few bits of pepper or spices on the belly.)
- Move the pork to a clean cutting board and pat it very dry with paper towels. Place it meat side up. Crush the remaining tablespoon of black peppercorns with a heavy pot and rub the crushed pepper over all the meat sides to create an even coating.
- Roll the pork belly very, very tightly into a cylindrical shape, starting at whichever end makes the roll most uniform. Make sure there are no air pockets inside the pancetta. Tie it very tightly with butcher’s twine at 1- to 1-1/2-inch intervals. Be sure to leave enough extra twine to hang the pancetta with.
- Hang the pancetta in a slightly cool, dark, moderately humid place where air can circulate freely around it. (Ideal conditions are around 60°F and around 60 percent humidity.) Keep it out of direct sunlight and away from air vents. A basement is ideal, as is a bathroom that isn’t used often (a shower curtain rod works great for hanging, but not if you’re showering in there!). I hung mine both next to the kitchen sink and in the bathroom, and I never had one pancetta go bad.
- Let the pancetta hang for 2 weeks. It will emit a subtle smell, sort of savory and sweet like the cure. If it smells rancid or rotten, take it down and trash it. When the pancetta is completely firm but pliable like leather, it’s ready.
- Cut down the pancetta and wrap it tightly in plastic wrap. Store it in the refrigerator for 2 to 3 weeks, or in the freezer for up to 4 months.
- Note: Pancetta is not meant to be eaten uncooked. Be sure to cook it, just as you would bacon, before eating.

The Rating
Reviewed by 12 people-
I was glad to see this recipe of yours. I have been making apple wood smoked bacon, Tasso Ham and several sausages this past year and I really enjoy it. I have been wanting to make prosciutto, but I can't think of a safe place to hang one for two yea...more
 vino4dino
in Baltimore loved it
vino4dino
in Baltimore loved it
-
Well it would be a sin for me to make Pancetta in Italy. but i have to try it someday..Will give it a shot! Thanks Helene
 uk2nyc
in West Hollywood loved it
uk2nyc
in West Hollywood loved it
-
I have this book marked
Is there anything you do not make to perfection !!
Michael trigger
in loved it
trigger
in loved it
The Groups
- Not added to any groups yet!
Reviews & Comments 17
-
All Comments
-
Your Comments
" It was excellent "
" It was excellent "
" It was excellent "
" It was excellent "
" It was excellent "
" It was excellent "
" It was excellent "
" It was excellent "
" It was excellent "