All You Need To Know About Making Russian Pierogis
From juels 17 years ago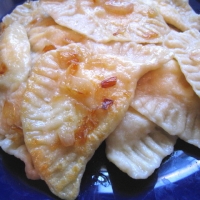
- 10 minutes to make
- Serves 6
Instead of just posting one variation of pierogis, I decided to share all I know about making Russian pierogis. This recipe includes shaping basics, the basic dough and 5 possible stuffings for Russian pierogis. Read more You only need to use one stuffing per batch of dough. See less
Ingredients
- For The Dough (makes about 6 dozen): shopping list
- 1 tsp. salt shopping list
- 3 eggs shopping list
- 1 cup warm (not hot) water shopping list
- 4-1/2 cups all-purpose flour shopping list
- extra flour for rolling the dough shopping list
- For The potato Pierogi Filling: shopping list
- 6 medium potatoes (I like to use red) shopping list
- 8 tbsp. butter, softened shopping list
- 6 oz. cream cheese, softened shopping list
- 1 onion, chopped and sauted until soft shopping list
- salt and pepper to taste shopping list
- 2 onions+ 4 tbsp. butter for the butter sauce (optional) shopping list
- For The Meat Pierogi Filling: shopping list
- 2 tbsp. butter shopping list
- 1 tbsp. oil shopping list
- 1/2 cup finely chopped onions shopping list
- 6 oz. lean groun beef shopping list
- 6 oz. ground pork shopping list
- 1 tsp. salt shopping list
- 1/2 tsp. pepper shopping list
- 1/2 cup cold water shopping list
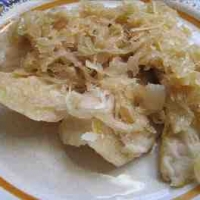
- For The cabbage Pierogi Filling: shopping list
- 1 can (15 oz.) souerkraut, drained shopping list
- 1 small head of cabbage, shredded shopping list
- 1/2 package of bacon, cooked, drained on paper towels and crumbled shopping list
- 1 onion, chopped shopping list
- 1 tsp. sugar shopping list
- 4 tbsp. sour cream shopping list
- salt and pepper to taste shopping list
- 2 onions, chopped+4 tbsp. butter for the onion butter sauce(optional) shopping list
- For The cheese Pierogis: shopping list
- 2 lbs. ricotta chesse shopping list
- 4 tbsp. sugar (add more sugar if you prefer them sweeter) shopping list
- 2 egg yolks shopping list
- 2 tbsp. melted butter, cooled shopping list
- 1/2 tsp. salt shopping list
- 1 cup sour cream shopping list
- For The fruit Filled Pierogis: shopping list
- Use your favourite fruit pie filling, like cheery, blueberry, etc., or make your own. shopping list
How to make it
- To Make The Dough:
- In a large mixing bowl, combine flour and salt and make a deep well in the center. Drop in the eggs and warm water.
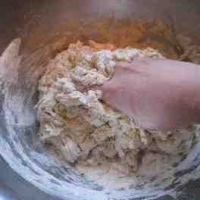
- Here comes the fun part. I like to mix the dough with my hands, rather than utencils. This helps you "feel" the dough and mixes it a lot better. Take off any hand jewelry and mix the flour into the liquid ingredients, until the mixture can be gathered into a compact ball.
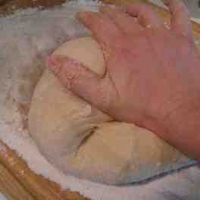
- Transfer the dough to a lightly floured surface and knead it by pressing it down and pushing it forward with the heel of your hand. Sprinkle the dough with extra flour if necessary to prevent it from sticking to the board. Knead for about 10 minutes, or until the dough is smooth and elastic. Shape it into a ball, cover loosely with ceran wrap and let rest for about 10 minutes.
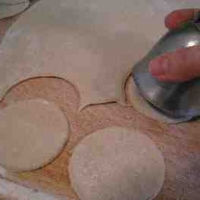
- Divide the dough in 2 parts. On a lightly floured surface, roll the dough into a rough circle, about 1/8-inch thick. Flip the dough over and roll on the other side as well.
- Using a 2-1/2 to 3-inch cookie cutter, cut out rounds of dough. Do not stack the cut outs, as they may stick together. The same goes for the shaped dumplings. Place them in a SINGLE layer, on a FLOURED surface and keep covered with wax paper to prevent from drying.
- When ready to fill, stretch a circle cut out with your fingers and place a little less than a tbsp. of chosen filling in the middle. (Recipes for fillings are included on this page). Also note that you only need to use one stuffing per batch of dough. Fold the dough over the filling. Seal the edges with your fingers first, then go over them with the prongs of a fork. This adds a decorative touch as well. *Note: For the meat pierogis, a traditional fold is to also lift the two corners, pinching them together to form a circular pouch (refer to pictures).
- Bring 3 quarts of water to a boil over high heat. Add a small amount of oli to the boiling water (this will help dumplings not to stick during cooking). Add 1 tsp. salt to the boiling water. Drop about a dozen of pierogis into the water. Gently stir and reduce the heat to a light boil.
- Cook, uncovered, for about 5 minutes. Generally, they are ready when rise to the surface. With a slotted spoon, transfer them to a bowl and immediately coat with some olive oil or butter.
- I usually make an onion butter sauce by sauteing 2 chopped onions in 4 tbsp. of butter and then lightly brown the cooked dumplings in non-stick skillet in this sauce. This will keep them from sticking when cooled.
- If you don't want to cook all the pierogis at the same time, place uncooked dumplings in a single layer on a floured cookie sheet and sprinkle with extra flour. Then put in the freezer for about 30 minutes. Take out and place in a ziplock. Store in the freezer until ready to use. When ready to use, just add the frozen dumplings to the boiling water.
- For The Potato Pierogi Filling:
- Boil the peeled potatoes in water until soft. Drain the water, mash the potatoes. Stir in 8 tbsp. softened butter, cream cheese, sauted onion, salt and pepper. Mash again until smooth.
- Note: After dumplings are cooked, saute 2 chopped onions in 4 tbsp. butter and fry the dumplings lightly in this sauce.
- For The Cabbage Pierogi Filling:
- Saute shredded cabbage and onion in some oil and butter until soft, reduced in bulk and lightly caramelized. I like to add 1/3 cup water to the cabbage while it's cooking and cover it with lid. This helps it to cook faster.
- When cabbage is cooked, add a can of souerkraut and cook for 8 minutes longer.
- Stir in sugar, salt and pepper to taste and crumbled bacon. Cook for 3 more minutes. Take off the heat and stir in 4 tbsp. sour cream.
- Note: When dumplings are cooked, saute 2 chopped onions in 4 tbsp. butter and fry the dumplings lightly in this sauce.
- For The Meat Pierogis:
- In a skillet, melt butter in the oil and saute the chopped onions until they are soft, about 3-4 minutes.
- Scrape the onions into a large mixing bowl. Add the raw meats, salt, pepper and 1/2 cup cold water. Mix with a large spoon or your hands until well combined and the mixture is smooth. *Note: this filling doesn't get cooked prior to boiling. The ground meat cooks fast in boiling water.
- For The Sweet Cheese Pierogis:
- Beat the sugar into the Ricotta cheese. Then beat in the egg yolks, melted butter and salt. Stir in the sour cream. If you prefer sweeter filling, add more sugar. These dumplings are served with extra sour cream or maple syrup when cooked.
- For The fruit Filled Pierogis:
- Just use your favourite fruit pie filling such as cherry, blueberry, etc. These are served with sour cream or maple syrup when cooked.
 mix dough by hand
Close
mix dough by hand
Close
 knead the dough
Close
knead the dough
Close
 cut out circles
Close
cut out circles
Close
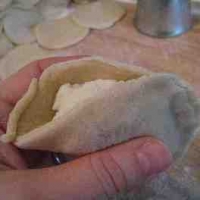 fold sides over
Close
fold sides over
Close
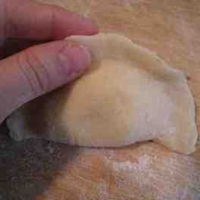 pinch the sides
Close
pinch the sides
Close
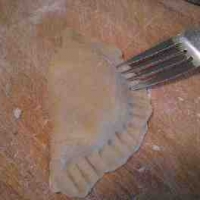 press with fork
Close
press with fork
Close
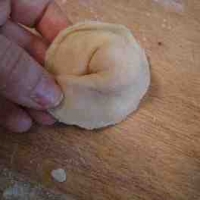 fold for meat pierogi
Close
fold for meat pierogi
Close
 sprinkle with flour
Close
sprinkle with flour
Close
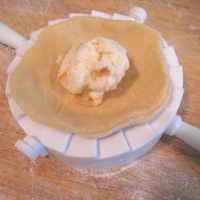 using pierogi maker
Close
using pierogi maker
Close
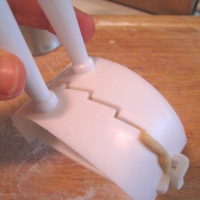 using pierogi maker
Close
using pierogi maker
Close
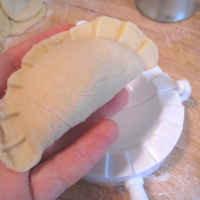 using pierogi maker
Close
using pierogi maker
Close
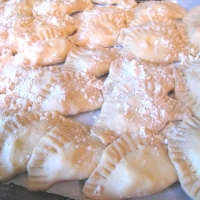
 cabbage pierogi w/souerkraut
Close
cabbage pierogi w/souerkraut
Close
People Who Like This Dish 49
- kaijavb MD
- leotie Nowhere, Us
- Trebek Nowhere, Us
- HannahJo20 Nowhere, Us
- amam Nowhere, Us
- tamdog Nowhere, Us
- penley Frazeysburg, OH
- Kingswood Nowhere, Us
- glbaskin Nowhere, Us
- AlleyR NS, Canada
- Plus 39 othersFrom around the world!

The Rating
Reviewed by 31 people-
Wow, is this a hit, or what! You must have spent all day post this recipe! Your pix and directions are so complete and there's nothing I can say that hasn't been said by someone else. I really like pierogis and am going to bookmark this for future us...more
 conner909
in Whereabouts loved it
conner909
in Whereabouts loved it
-
Hey, Juels! Thanks, thanks, thanks for this!! I have been looking thru' old community cook books looking for pierogis recipes that are authentic, and I know I can stop searching now. Can't wait to make these for my favorite bro-in-law! I am trying to...more
 m11andrade
in Kankakee loved it
m11andrade
in Kankakee loved it
-
A stellar and super informative post, my dear! I adore pierogis and your detailed post makes me smile and so want to make my own. I just can't say how good these look and sound. Bravo - forks and beauty flag a'flying. Wow! :) I'll be trying thes...more
 lunasea
in Orlando loved it
lunasea
in Orlando loved it
The Groups
-

Russian Speakers
22 members -

Pastabilities
217 members -

Pasta Place
196 members -

Russian American Food Lovers
37 members -

FROM SCRATCH
149 members -

PolishUkrainian
110 members -

Companys Coming
121 members -

Pasta Lovers
98 members -

FABULOUS FRUGAL FOODIES
253 members -

Comfort Foods
25 members
Reviews & Comments 35
-
All Comments
-
Your Comments
" It was excellent "
" It was excellent "
" It was excellent "
" It was excellent "
" It was excellent "
" It was excellent "
" It was excellent "
" It was excellent "
" It was excellent "
" It was excellent "
" It was excellent "
" It was excellent "
" It was excellent "